
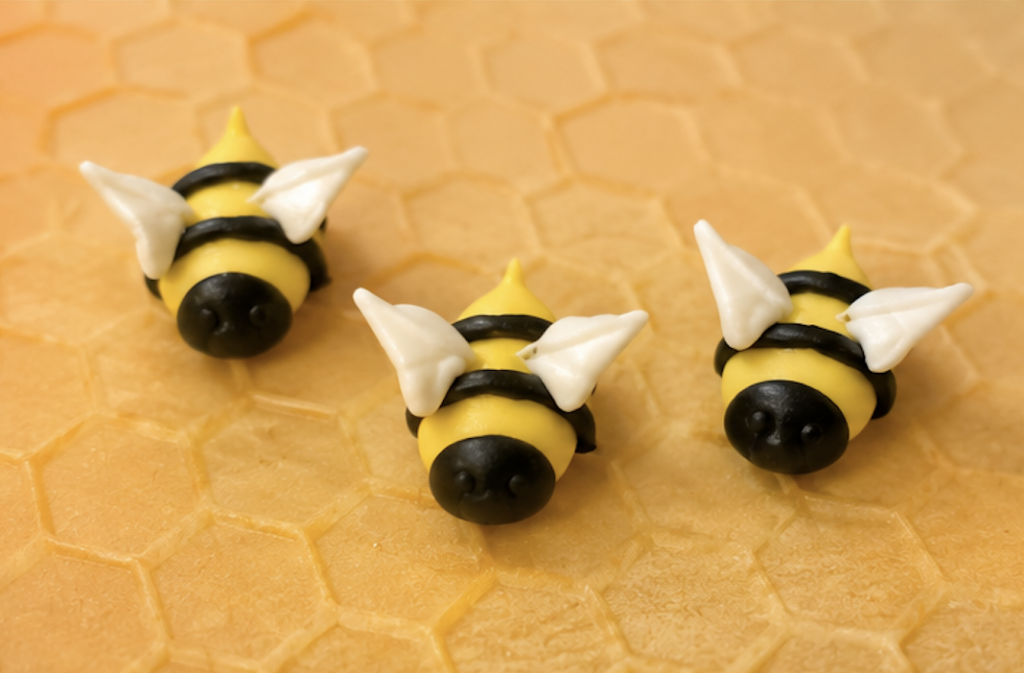
Looking for a sweet and simple edible decoration for your cookies, cupcakes, and cakes? These adorable royal icing bees are the perfect addition to spring desserts, garden-themed treats, and bee-inspired celebrations.
At My Magical Corner, we love creating fun decorations that are easy to make and add a magical touch to your baking projects. In this tutorial, you’ll learn how to make royal icing bees from scratch, including how to prepare the royal icing and pipe the bee bodies, stripes, and wings.
Royal Icing Recipe
Before creating your bees, you’ll need to prepare a batch of royal icing.
Ingredients
- 1 pound powdered sugar
- 3 tablespoons meringue powder
- 4 tablespoons water
- 1 tablespoon corn syrup
- 1 teaspoon vanilla extract
Instructions
- Place the powdered sugar and meringue powder into a mixing bowl.
- Add the water, corn syrup, and vanilla extract.
- Mix on a low speed for approximately 5 minutes.
- Continue mixing until the icing loses its shine and becomes thick and creamy.
- If the icing seems too stiff, add a small amount of water, one drop at a time.
- The finished icing should hold stiff peaks while remaining smooth and creamy
Once your icing is ready, divide it into separate bowls and color:
- Yellow for the bee bodies
- Black for the faces and stripes
- White for the wings
Helpful Tip
Royal icing dries quickly, so always keep it covered with a damp cloth when not in use.
Supplies You’ll Need
- Royal icing (yellow, black, and white)
- Decorating bags
- Couplers
- Wax paper or parchment paper
- Piping tips:
- #12 for the bee body
- #3 for the face
- #2 for the stripes
- #352 leaf tip for the wings
Preparing Your Decorating Bags
Fill your decorating bags with the appropriate icing colors:
- Yellow icing fitted with tip #12
- Black icing fitted with tip #3 and later tip #2
- White icing fitted with tip #352
Before piping, squeeze a small amount of icing from the tip to remove any air pockets.
Step 1: Pipe the Bee Body
Using yellow icing and tip #12:
- Hold the piping bag at a 45-degree angle.
- Apply firm pressure to create a rounded shape.
- Gradually reduce the pressure while pulling away.
- This will create a rounded body with a slight point at one end.
Repeat until you have as many bee bodies as you’d like.
Step 2: Add the Face
Switch to black icing fitted with tip #3.
- Pipe a small circle at the front of each bee.
- Fill in the circle as you pipe.
- Make sure the face is smooth and fully covered.
If necessary, gently smooth any peaks once the icing begins to set.
Step 3: Pipe the Stripes
Switch to black icing fitted with tip #2.
- Pipe curved stripes across the body of each bee.
- Add as many or as few stripes as you prefer.
- For a cleaner look, use light, steady pressure.
The smaller tip creates delicate stripes that add a more realistic appearance.
Step 4: Create the Wings
Using white icing and tip #352:
- Hold the leaf tip upright rather than flat.
- Gently touch the body where you want the wing to begin.
- Squeeze and pull upward to create a wing shape.
- Repeat on the opposite side.
You can make larger or smaller wings simply by adjusting the amount of pressure you apply.
Wing Tip
Think of the leaf tip like a tiny “Pac-Man” shape. The opening should face outward as you pipe each wing.
If small points appear on the ends of the wings, gently pinch them off with your fingertips before the icing dries.
Drying Your Royal Icing Bees
Allow the bees to dry completely before removing them from the wax paper.
For best results, let them dry overnight or for at least 12 hours.
Once dry, they can be carefully lifted and stored until you’re ready to decorate.
Ways to Use Your Royal Icing Bees
These cute little bees are perfect for:
- Cupcakes
- Sugar cookies
- Birthday cakes
- Spring desserts
- Garden party treats
- Baby showers
- Bee-themed celebrations
They can be made ahead of time and stored in an airtight container until needed.
Final Thoughts
These royal icing bees are a fun and easy decorating project that adds a charming touch to any dessert. With a simple royal icing recipe and a few decorating tips, you can create adorable edible bees that are sure to impress family and friends.
I hope you enjoyed this tutorial from My Magical Corner and feel inspired to create your own sweet little bees.
Happy decorating, and remember—there’s always something magical to create at My Magical Corner!